Scanning Color Negatives: A Method
Thus far my approach to scanning color negatives has been to play with it until it looks reasonable. It was time to sit down and figure out a better method.
The thing about color negatives is that there is no reference for what the image is “supposed” to look like: not only is the film a negative, it’s got the orange mask. But one thing that is certain is that I want to start with as faithful a representation of the film image as possible.
I seem to have worked out a method. I make no claim that this is the best of all possible approaches, or that I won’t figure out something better later, but it seems to work.
I’m using a Nikon Coolscan 5000, with VueScan software to do the scanning. VueScan does a good job, but has one of the worst user interfaces I’ve ever used; figuring it out is difficult and scanning with it takes a few times longer than it should, so it’s my hope that this will help others trying to do the same thing.
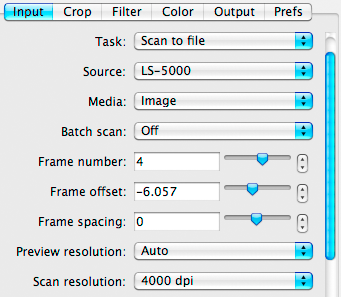
One thing I found scanning slides was that setting “Media” to “Slide film” in VueScan is never, ever what you want when scanning slide film. With this setting, VueScan adjusts your scan’s colors to “compensate” for the film’s characteristics, neatly defeating the purpose of scanning it in the first place. With negatives it’s much the same: choosing “Color negative” will make VueScan do terrible things to your pictures, based on “profiles” it has for various types of film.
Obviously we don’t want this, or any other behind-the-scenes adjustments, so the first thing to do is set VueScan’s “Media Type” to “Image,” same as we use for slide film. Of course, this means VueScan will no longer invert the negative or remove the orange mask, so I’ll be doing that myself later.
VueScan also doesn’t seem to be very good at finding the edges of the frames on a strip of color negative film, at least in “Image” mode. I found it necessary to preview a frame and adjust the offset until it lines up properly. Unfortunately, VueScan makes you guess at the adjustment and re-scan the preview until you get it right.
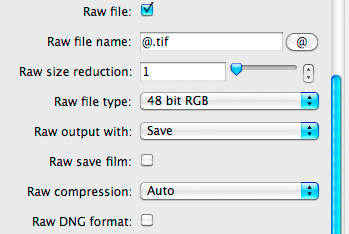
Next, we have to make sure VueScan doesn’t do anything to the scanned image that we don’t want. It supports saving of “Raw” files—and those files are actually just TIFF images that can be loaded into any image editor. (VueScan’s Raw mode should not be confused with digital camera RAW files, which are completely different and wholly unrelated.)
To get VueScan to save the Raw file, go to the Output tab and check the “Raw file” option. You can disable the saving of regular (processed) files, too, since those won’t be useful.
Setting the filename to “@.tif” (which is the default setting for the processed files) gives your Raw files the normal auto-generated filenames that VueScan normally uses. “48 bit RGB” gives you 16-bit-per-channel TIFF files. Another option is 64-bit RGBI, which saves the infrared channel as a fourth channel; this could be handy if some other program could do the infrared cleaning, but I’m not aware of any.
In order to get VueScan to apply its infrared cleaning (Digital ICE equivalent) to the Raw scan, you set “Raw output with” to “Save,” in a breathtaking example of user interface obscurity. (Setting this to “Scan” saves the image as it’s being scanned, before the cleaning takes place.) The “Raw save film” option apparently tells it to apply its color adjustments to the Raw output as well—good luck figuring that out without the manual—so we obviously want that turned off.
Now, what we’re getting is an image with none of the unwanted corrections, but with the infrared dust-and-scratch cleaning applied, in TIFF format, not gamma-corrected (gamma 1.0, or linear), and with no color profile attached.
I enable Multi-exposure mode in VueScan’s Input tab, to ensure that the full range of the negative is captured in the scan.
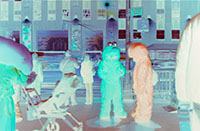
With all that set up, scan the image. The result will be a negative image that still needs to be corrected before you can work with it. You can batch-scan a series of images this way before moving on to the next step.
Load the image into Photoshop. (You can do equivalent steps in any reasonable image editor, of course.) First, because our raw scan uses linear gamma, we need to apply a gamma correction. You can do this by assigning a linear (gamma 1.0) profile and converting to Adobe RGB or some other working space. If you don’t know what that means, follow the instructions in the next paragraph instead.
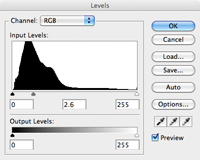
Assign the Adobe RGB profile (Edit → Assign Profile), regardless of VueScan’s output color space (the output color space doesn’t apply to Raw output). Now open the Levels adjustment and change the gamma. The middle of the three numbers is the gamma setting. What value to enter is a matter of taste; 2.2 is standard, but the result may be too bright in the shadows. 2.6 gives reasonable results. Unfortunately you can’t see what it will look like until you complete the next few steps, but you can revert the file and start over if it’s not right. (It’s better to apply a linear profile and convert the color space as described in the previous paragraph.)
Now, select Image → Adjustments → Auto Levels. This will remove the orange mask by “stretching” the color channels to both ends of the light/dark scale. You can accomplish the same thing manually in Curves or Levels, by moving the black and white points in each color channel to the end points of the histogram. If you want the purest result, you can set the white point using the unexposed film base (you’ll have to scan something that has clear film) and the black point to the darkest part of the exposed film. That’s a more complex method and I don’t think it’s necessary, but some people prefer it.
Finally, Image → Adjustments → Invert will invert the image into a positive. At this point we have a corrected, positive image, but it probably won’t look exactly “right.” Use Curves to apply a contrast curve to taste—the shadow tones in particular may need substantial darkening to restore normal contrast to the image. Negatives have a lot of dynamic range.
Save the image and you’re done. Further adjustments—color correction, sharpening, etc.—can be done in Lightroom, or right in an image editor like Photoshop (I prefer using Lightroom because it edits non-destructively). You can automate everything above using Photoshop’s Actions, once you determine an appropriate gamma value to set.
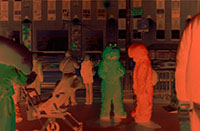
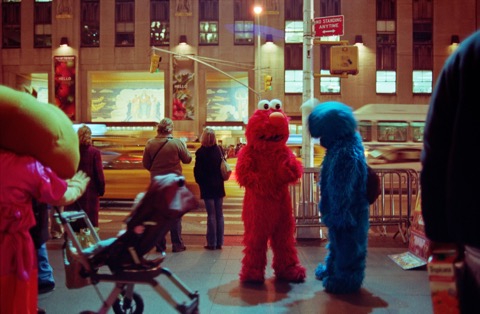
I haven’t applied any further color correction to the above image. I think this is a decent example image because any automatic color correction is unlikely to adjust it in a way I’d want, given the weird nighttime street lighting.
Scanned images prepared this way look much better than the normal, processed output from VueScan. Ideally, the scanning program would do exactly the above steps, no more and no less, automatically, but we don’t have ideal software.